For the Pastry:
for pastry:
2 C. AP flour
1 tsp. sugar
1/4 tsp. salt
12 T. cold butter, chopped into cubes
4 T. cold water
1. Combine flour, sugar, and salt in whichever device you decide to use, I used a food processor. Pulse until thoroughly mixed (same for stand mixer, or in a bowl with wooden spoon).
2. Add the cubes of butter to your flour mixture. This part is important to pay close attention to. You want to pulse (or cut with a pastry cutter, or two knives works the same) the butter into the flour mixture until there are still chunks of butter left. You don't want to cut the butter too small, but to keep cubes. What these will do is form into streaks once you've rolled the dough out, which will then be the element of flakiness added to your crust. After I was done pulsing, I realized that my butter had gone to pea size which is fine, but for best results you want a bit larger.
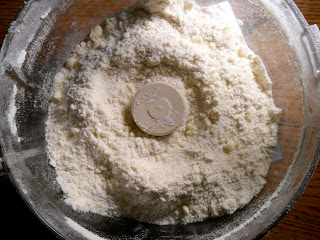
3. Next, you want to add the water. Many people question the necessity of having the water be "ice" cold. The reason you want your ingredients to be of cold temperature is because of the fats, if they melt or get too warm, your dough will not turn out properly. But all in all, I have found that when adding only a few tablespoons of water, if it's at room temperature this isn't going to melt or warm your butter/fats significantly. For adding in the water, it's best to use a spatula rather than pulsing or mixing. It will still turn out fine, but it is 1. easier to over mix, resulting in tough dough and 2. using a spatula will result in more buttery, flakier layers.
You want your dough to look like this when you are finished adding the water, don't worry about it not looking like a formed dough.
4. Sprinkle a clean surface (I like a to use a big wooden block for rolling pastries) of all purpose flour, but not too much. Take the dough and use the surface to form into a disk. Mine was about four inches in diameter, and one inch thick. Wrap the disc and refrigerate for a half hour.
5. Once your dough is chilled, lightly-and I mean lightly flour your surface. If you add too much, it will incorporate into the dough and alter the recipe. But, you also want to put down enough to prevent the dough from sticking to your rolling pin or surface. Unwrap your dough, and slice into six triangles.
6. Roll each one into a fairly thin circle, about four inches in diameter. Don't worry about getting the discs perfectly circled. Galettes are traditionally meant to be a very rustic pastry, and the edges will be pinched and crimped later anyways. Preheat your oven to 350 degrees.
7. Now is the fun part! You can literally put just about anything inside a gallette. I chose peaches-don't lecture me on seasonal fruit, I know that this seems a little ridiculous at this time but HEY it's the little things like this that help me get through the sad, gray winter. Line a baking sheet with parchment paper, and evenly place the six discs on top. Place your fillings in the center, and using a pinching technique, fold the edges towards the center. Don't be afraid to cover the filling, in the oven the galette will slightly open.
8. With a pastry brush, lightly brush an egg wash over the pastry. If you feel up to it, you can then refrigerate these for fifteen minutes to prevent a soggy crust on the bottom inner surface. I don't do this because oddly enough, I for some reason enjoy the slightly soggy crust-yeah I'm weird like that.
9. Place the baking sheet in the oven. I usually just bake things until I can smell them and they smell "done" which is what I did with these and completely forgot to keep track of time. I would say to be safe, bake for 10 minutes and check on them. You want them to be golden, shiny and flaky. If using fruit-you want it to just start bubbling.Use your best judgment, if they need longer bake and re-check in two minute increments until they are finished.
10. Let them cool on the sheet for five minutes, and then transfer to a cooling rack. Or, eat them hot from the oven!


No comments:
Post a Comment