Tuesday, March 6, 2012

Peach Galettes

Because I've worked with pie dough for so long, I felt more confident in tackling my first galette since the pastry is so similar. I've found that if you have a food processor or a standing mixer it makes the process much easier and pastry more concise, but it still is not necessary. Here, I will give you my personal 10 step by step tutorial.

For the Pastry:
for pastry:
2 C. AP flour
1 tsp. sugar
1/4 tsp. salt
12 T. cold butter, chopped into cubes
4 T. cold water

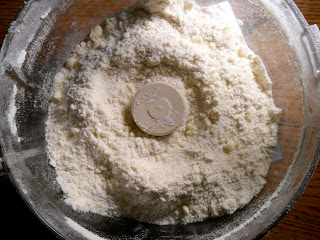
1. Combine flour, sugar, and salt in whichever device you decide to use, I used a food processor. Pulse until thoroughly mixed (same for stand mixer, or in a bowl with wooden spoon).

2. Add the cubes of butter to your flour mixture. This part is important to pay close attention to. You want to pulse (or cut with a pastry cutter, or two knives works the same) the butter into the flour mixture until there are still chunks of butter left. You don't want to cut the butter too small, but to keep cubes. What these will do is form into streaks once you've rolled the dough out, which will then be the element of flakiness added to your crust. After I was done pulsing, I realized that my butter had gone to pea size which is fine, but for best results you want a bit larger.
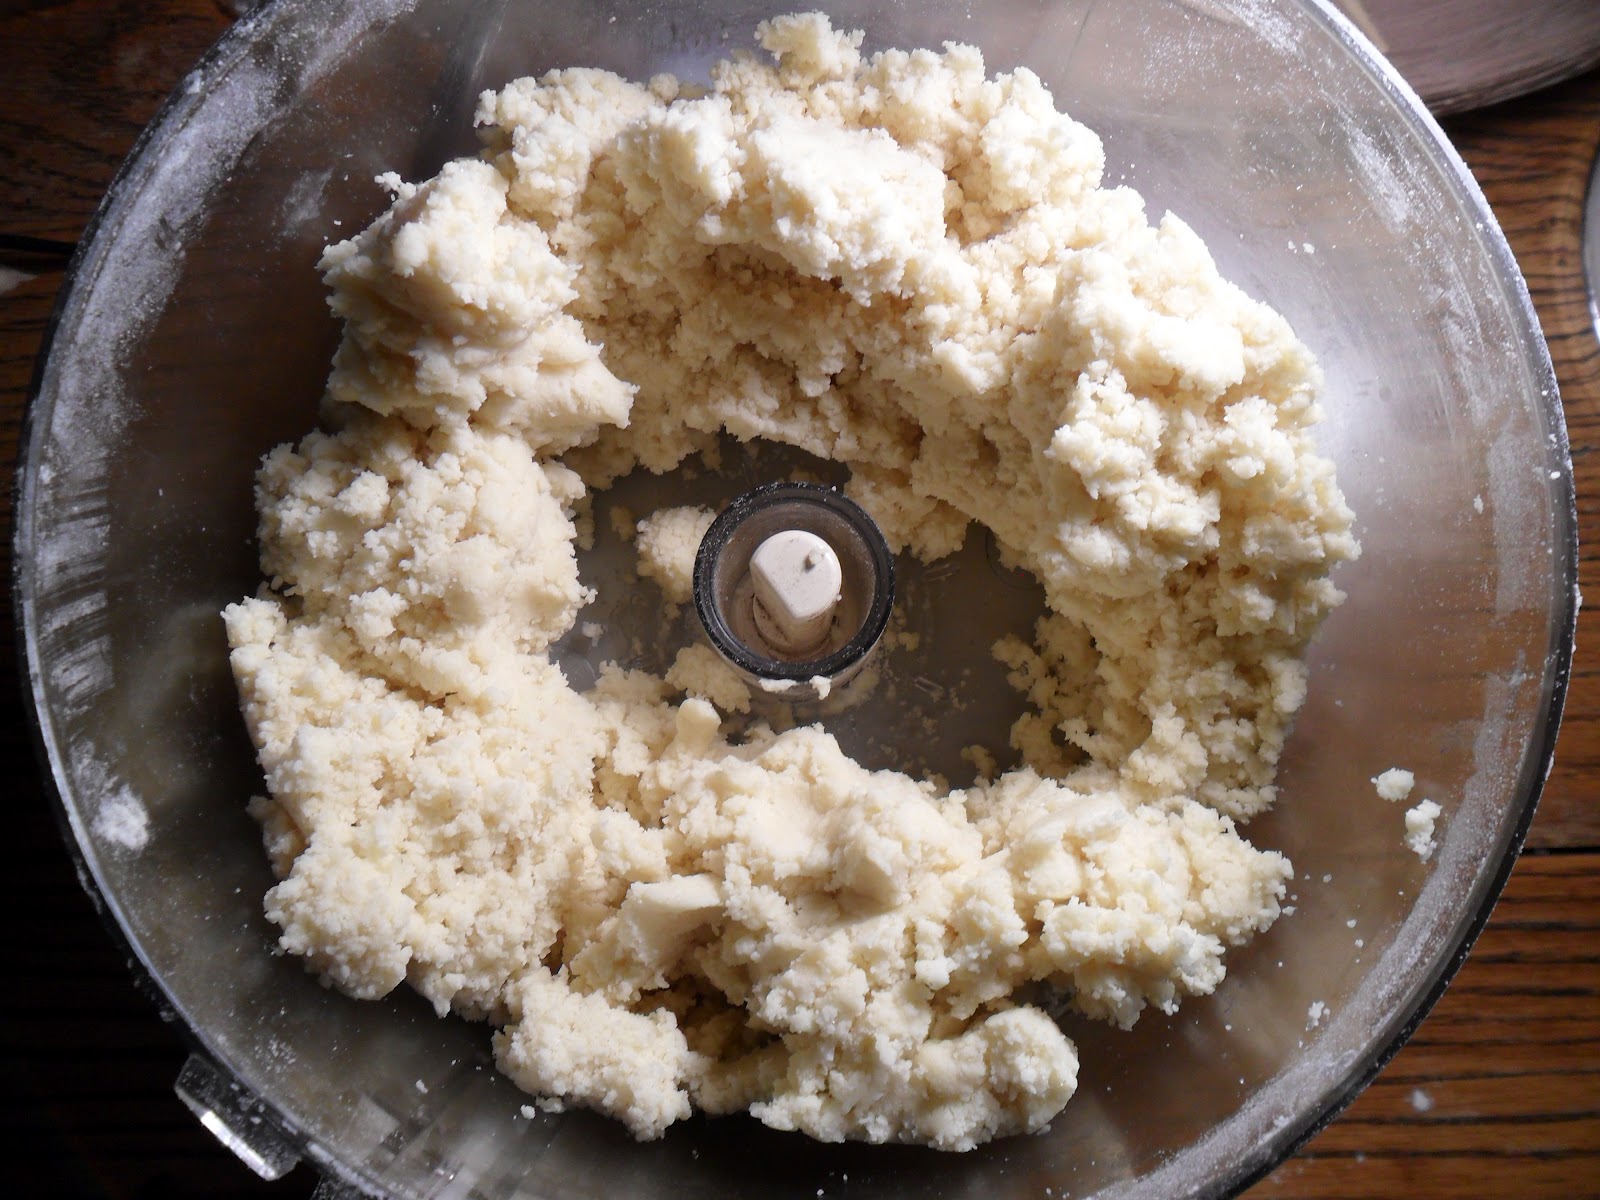
3. Next, you want to add the water. Many people question the necessity of having the water be "ice" cold. The reason you want your ingredients to be of cold temperature is because of the fats, if they melt or get too warm, your dough will not turn out properly. But all in all, I have found that when adding only a few tablespoons of water, if it's at room temperature this isn't going to melt or warm your butter/fats significantly. For adding in the water, it's best to use a spatula rather than pulsing or mixing. It will still turn out fine, but it is 1. easier to over mix, resulting in tough dough and 2. using a spatula will result in more buttery, flakier layers.
You want your dough to look like this when you are finished adding the water, don't worry about it not looking like a formed dough.

4. Sprinkle a clean surface (I like a to use a big wooden block for rolling pastries) of all purpose flour, but not too much. Take the dough and use the surface to form into a disk. Mine was about four inches in diameter, and one inch thick. Wrap the disc and refrigerate for a half hour.
You want to make sure your dough is chilled enough, again because you want your fats to stay solid. Also, if it is too warm than it is more difficult to roll out. If your kitchen is cold (like mine, winter is beastly in Bellingham), you can probably get away with fifteen minutes in fridge but there's nothing wrong with being careful!

5. Once your dough is chilled, lightly-and I mean lightly flour your surface. If you add too much, it will incorporate into the dough and alter the recipe. But, you also want to put down enough to prevent the dough from sticking to your rolling pin or surface. Unwrap your dough, and slice into six triangles.
6. Roll each one into a fairly thin circle, about four inches in diameter. Don't worry about getting the discs perfectly circled. Galettes are traditionally meant to be a very rustic pastry, and the edges will be pinched and crimped later anyways. Preheat your oven to 350 degrees.
7. Now is the fun part! You can literally put just about anything inside a gallette. I chose peaches-don't lecture me on seasonal fruit, I know that this seems a little ridiculous at this time but HEY it's the little things like this that help me get through the sad, gray winter. Line a baking sheet with parchment paper, and evenly place the six discs on top. Place your fillings in the center, and using a pinching technique, fold the edges towards the center. Don't be afraid to cover the filling, in the oven the galette will slightly open.
 8. With a pastry brush, lightly brush an egg wash over the pastry. If you feel up to it, you can then refrigerate these for fifteen minutes to prevent a soggy crust on the bottom inner surface. I don't do this because oddly enough, I for some reason enjoy the slightly soggy crust-yeah I'm weird like that.

9. Place the baking sheet in the oven. I usually just bake things until I can smell them and they smell "done" which is what I did with these and completely forgot to keep track of time. I would say to be safe, bake for 10 minutes and check on them. You want them to be golden, shiny and flaky. If using fruit-you want it to just start bubbling.Use your best judgment, if they need longer bake and re-check in two minute increments until they are finished.
 10. Let them cool on the sheet for five minutes, and then transfer to a cooling rack. Or, eat them hot from the oven!

Thursday, February 16, 2012

(Successful) French Macarons

Alas, my hard work has finally paid off. The first time I made these suckers was the day I discovered what they were, last summer. I literally had not even heard of them before that. Where have I been my whole life, right? Without any prior research, I literally found the first recipe I came to (mistake #1) without knowing at all how fickle they were I just "went for it". Needless to say, they didn't turn out.
The second trial-oh, I had done my research. I believe I read almost every single piece of information needed to succeed with these needy little things. I read many times about creating the "ribbon" that trails back into the bowl when you fold the almond mixture into the whipped egg whites. Because I was not getting this, or what I believed it should be, I kept mixing and mixing (mistake #2). Again, needless to say-the batter was too runny and they didn't rise properly. But oddly enough, there were some baby feet on the bottoms. This made me feel much better about my oven failure.
 And finally-my third trial. Why is it that the third time is always a charm? In honor of spending Valentines day with myself (and my kitchen) I decided to pour all of my energy that would have been spent on someone else on myself and these precious little macarons. They were receiving all of my love for the day. I had heard that you NEED a kitchen scale if you wanted proper results. Because I just love a good challenge I wanted to put this to the test. Well, and maybe because I am broke. Regardless, I wanted this to happen!

I couldn't find almond meal/flour anymore, so I busted out my food processor and ground those almonds up. Went for the confectioners sugar-of course, I'm out. This always happens, you'd think one would learn by now. Nope. I'm sure it will continue to happen throughout my life as well. With this, I poured some sugar in the processor and processed until it was almost powdered. Then I had to add cornstarch :(. Which, normally, I would completely stay away from but hey when you're in a pinch, you gotta do what you gotta do. These macarons were already getting so much from scratch attention, my goodness.
 I whipped the meringue until those sweet peaks couldn't get any stiffer. I was so anxious to fold in the almond mixture-but this time I was confident I knew just the right consistency that was needed. Just a few times, and because it was V-day, of course a tiny drop of red, (Okay, I'll use any excuse to make something pink) and in the piping bag it goes! Little perfect circles on the parchment paper, and the first batch goes in. There would be one more batch-I had plenty of time to wait and ponder my poor dating choices since last Valentines day.
Finally, the moment came down to this. I opened the oven and-literally squealed. And danced, and clapped and almost cried. I may have shed a light tear. They weren't perfect, but for me-I was ecstatic. They even had little feet. Voila! My first batch of successful macarons! And how convenient was it that I had left over pastry cream that needed to be used? Now that I have gotten down a simple vanilla, here's to spending way too much time discovering every possible flavor combination on these beauties.

Vanilla Bean French Macarons by Volume:
1 cup confectioners' sugar
3/4 cup almond flour
2 large egg whites, room temperature
Pinch of cream of tartar
1 vanilla bean
1/4 cup superfine sugar
  1. Pulse confectioners' sugar and almond flour in a food processor until combined. Sift mixture 2 times.
  2. Preheat oven to 375 degrees. Whisk whites with a mixer on medium speed until foamy. Add cream of tartar, and whisk until soft peaks form. Reduce speed to low, then add superfine sugar. Cut vanilla bean open lengthwise and scrape seeds out with a knife. Add seeds to bowl. Increase speed to high, and whisk until stiff peaks form, about 8 minutes. Sift flour mixture over whites, and fold until mixture is smooth and shiny.
  3. Transfer batter to a pastry bag fitted with a 1/2-inch plain round tip, and pipe 3/4-inch rounds 1 inch apart on parchment-lined baking sheets, dragging pastry tip to the side of rounds rather than forming peaks. Tap bottom of each sheet on work surface to release trapped air. Let stand at room temperature for 15 minutes. Reduce oven temperature to 325 degrees. Bake 1 sheet at a time, rotating halfway through, until macarons are crisp and firm, about 10 minutes. After each batch, increase oven temperature to 375 degrees, heat for 5 minutes, then reduce to 325 degrees.
  4. Let macarons cool on sheets for 2 to 3 minutes, then transfer to a wire rack. (If macarons stick, spray water underneath parchment on hot sheet. The steam will help release macarons.)
  5. Sandwich 2 same-size macarons with 1 teaspoon filling. Serve immediately, or stack between layers of parchment, wrap in plastic, and freeze for up to 3 months.

Wednesday, February 15, 2012

Cream Puffs

Cream Puffs. Ok, so the words are daunting. But-I have always wanted to make them, and since they are both on my list why not knock out a choux dough and a pastry cream? Besides, the title of the recipe included the words "not as hard as you think they'd be". That's encouraging, and sometimes that's all I need to take a deep breath and try. Which is what I will upfront admit this was-a try. They weren't what I had hoped, but I am still proud of myself for what came of them! And that's saying a lot-generally I slap my wrists for failing in the kitchen.

 
The choux was fun to make-I think that the dough may have been too runny, and I can't quite figure out what could have caused this since I followed the recipe religiously. Perhaps one too many eggs? I made my first batch and three out of the eight (I made large ones) "puffed" properly. The others I tasted, and they tasted exactly like a cream puff dough-this was so exciting! But, sadly I discarded them (meaning I gave them to my roommates to dip in the extra pastry cream.)


Because I got so close with these, I know I want to try them again. The ones that turned out were fantastic-I whipped up some heavy cream and folded that in with a vanilla custard I had made earlier on. Piped it into the puffs, and topped them with a simple ganach. Luckily I wasn't discouraged enough to not try them again. These shall be perfected one day.


Thursday, February 9, 2012

Classic Chocolate Mousse


 I wanted to start out with the basics before jumping ahead, and where else better than a classic chocolate mousse? Besides, all I knew about mousse was that it tasted like a fluffier, richer pudding. Yes-that would have been my best description if you had asked me what mousse was before last night. 

I was thrilled when I realized there were three main components-dividing up a process during baking helps me to mentally organize and keep track of different stages. A ganache, meringue, and whipped cream. Ha! Simple enough. 


Once it was finished, I must say I was fairly pleased with myself. It's always encouraging to get something close to perfect on your first shot. Which also means I will probably fail miserably with something else soon. Yes, it was fluffy, creamy, smooth, but still, in the end, it was just mousse. I wasn't fully satisfied. 

Throughout time my house has collected adorable mason jars of such sorts, and I instantly thought back to a Cupcake Wars episode about a bakery that makes a "cupcake in a jar". So, I whipped up a batch of my go to chocolate cupcakes I used to make daily at the vegan cafe. Even though they are vegan-they are the most moist, rich, perfectly rising cupcakes I have ever made, which is why they will always be what I go to. Well, that and I have the recipe memorized. 

After they cooled I sliced those decadent little suckers up and layered them between the light mousse. Voila! Now if only I had the lids to these jars..they would make a damn adorable little gift.

Ingredients:
2 tablespoons unsalted butter
1/2 cup bittersweet or semisweet chocolate
3 eggs, separated
1/4 cup sugar
1/2 cup heavy cream
1/2 teaspoon vanilla extract (with an extra splash)

Directions:
Melt butter and chocolate together in a double boiler or sauce pot with a bowl parked on top. Remove from stove. Whisk egg yolks into the chocolate mixture and place in the refrigerator. In a large bowl and with a large whisk (or with a hand mixer), beat egg whites for a minute or two. Add half the sugar to the egg whites and continue to beat until they form stiff peaks, another 3 minutes or so. Set aside. In another large bowl and with a large whisk (or hand mixer if you have one), beat cream for about a minute. Then add the remaining sugar and vanilla until it holds soft peaks, about 2 minutes. Be very careful not to over-beat the cream. If it has a cottage cheesy texture, you have gone too far. Take the chocolate mixture out of the refrigerator and stir in a couple of spoonfuls of the whites. Then fold in remaining whites thoroughly but gently. Fold in cream in the same manner. Stick mixture back into the fridge until chilled. Add some fruit or chocolate shavings and savor every decadent bite.

If you want to do what I did with the layered cakes in a jar, just make your favorite cupcake recipe, let them cool, slice them in half or thirds and layer your little heart away. If you have left over heavy whipping cream from your mousse (you should) I suggest making a whip cream for the top-homemade is ALWAYS best. :)

Chocolate Cake with Raspberry Curd and White Chocolate Butter Cream

What a better place to start then my birthday? Ok, so maybe it was a whole week ago but I have to say blogging has been intimidating-and of course I always find other things that "need to be done". You know, like organize all of my clothes by color. (Even though they're all black.)
As a little girl, dark chocolate and raspberry has always been my choice of birthday cake-and I believe that it will forever have my heart each January that comes around. This year I decided I wanted to make my own birthday cake. Why you ask? Well, I know what I want! And of course, anyone such as me will take any excuse to bake something. 

Layer cake. My first ever-it never seemed daunting to me-just exciting and I had no idea where to start. So of course, I decided on six layers-three rich dark chocolate cakes, sliced in half, a raspberry curd in the center, and a white chocolate butter cream to wrap with. WHOA. 


Since I began making the cake after school and had a sushi date by 7, I decided to stick with a simple two layer-I tend to get ahead of myself quickly. I had made the white chocolate butter cream the night before-we have a fantastic food co-op here that has the most velvety blocks of satin white chocolate. 

The curd was strained. The butter cream was ever so fluffy and smooth. The cakes were cooled and sliced. It was time. After I had stacked and filled the center, I was about to frost the first "crumb seal" layer when I thought, "You know what? This is my last birthday cake as a teen and dammit I just want it to be pink." So there you have it. Pink, Chocolate layer cake with raspberry curd and a white chocolate butter cream. 

Hooray for 20 and the next decade until I reach my mid life crisis! (Is it possible to have a quarter life crisis?)


And so it Begins!

Here goes my first post, on my first blog ever! (A little late on the band wagon, I know.) I’ll start out with my name, Danae Rose. I’m nineteen and I’ve been baking most of life along side my mother and her mother, and throughout the past three years I’ve been working at small little bakeries and cafes.
I began volunteering for a non profit coffee shop in Seattle, where I am from. Here I was trained to bake muffins, bars, cookies, scones, and quiches. Eventually I moved to another neighborhood where I became a pie baker. This was where I fell in love with baking, and began to recognize it as an art form. Every morning at 5am I would bike to work, and there was nothing more therapeutic than putting on some relaxing tunes and baking pies. Making the dough, rolling the fruits in sugar, crimping the edges, brushing the tops and the smell that would flood the entire shop was simply heaven.
Eventually I moved once again and became a baker at a little vegan cafe. This stretched what I knew as baking, and forced me to expand my creativity to develop something just as delicious with limited ingredients. This was a wonderful experience that opened my eyes to new ways of thinking about desserts.
I left for college this past August, and am currently up in a little place called Bellingham in Washington state. I landed a job at a little place called Mount Bakery (we are right next to Mount Baker-adorable, I know). For now I am helping with small baking projects, but I desperately need more in my life. Which is where this project comes in-I am fortunate enough to attend a school where I can earn credit for any kind of learning project my little heart desires. Here I will be researching the technicality and science of baking-and focusing on perfecting what I have always wanted to tackle but have shied away from due to intimidation. 
I want to make a perfect little macaroon (this one will obviously take many tries!), find the best buttercream, make a pastry cream, mousse, lemon curd, layered cakes, tarts, cheese cakes, galettes, and anything that I come across and feel afraid of. I’ll be photo-ing, writing, and pasting recipes along the way!